mardi 31 janvier 2017

Raspberry épisode 20 : internet, capteur DHT, écran LCD

Nous y voici,
nous allons très rapidement voir comment récupérer des informations d'internet dans une 1ere partie puis ensuite montrer dans une seconde partie comment mixer le tout, pour monter ce projet d'afficheur de météo, et relevé de température et d'humidité sur écran LCD.

Voici la partie 1:
import urllib

page=urllib.urlopen('http://python.org') 
strpage=page.read()
 
http://python.developpez.com/faq/?page=Reseau-Web#WebRead  
http://python.developpez.com/cours/DiveIntoPython/php/frdiveintopython/html_processing/extracting_data.php

Ca c'est fait 

Partie 2:
récupérer la météo du jour:
j'utilise meteo24.fr qui permet d'afficher un minimum d'information annexe
exemple pour Paris : http://www.meteo24.fr/meteo/hptool/index.php
Pour les autre villes allez sur meteo24.fr, recherchez votre ville et notez le code 
33Xxxxx (33 pour la France, et les xxxx pour le code de la ville)
adaptez le code dans l'URL ci-dessous
http://www.meteo24.fr/meteo/hptool/index.php?cid=33X3855
(pour bordeaux)

En Python:
import urllib2
url = "http://www.meteo24.fr/meteo/hptool/index.php?cid=33X3855
request = urllib2.Request(url)
handle = urllib2.urlopen(request)
content =handle.read()
splitted_page = content.split("splitted_page = splitted_page[1].split("", 1)
print "Downloads: " + splitted_page[0]
 
Oui mais on ne veux pas toute la page, juste les informations utiles
on utilisera pour cela, la fonction Split qui permet de couper une chaine de caratères.
 
splitted_page = content.split("splitted_page = splitted_page[1].split("", 1)
 
Ainsi on coupe la page en 2 jusqu'au Span Style, puis on recoupe jusqu'au /Span

Voici le résultat de mon script BUS.py

# -*- coding: utf-8 -*-
#pour importer des données d'internet 
import urllib2
#pour écrire sur l'écran LCD
import I2C_LCD_driver
 
#pour avoir la date du jour 
import time
#pour récupérer les valeurs d'une commande (DHT22)
import os

mylcd = I2C_LCD_driver.lcd()
#pour effacer l'écran 
mylcd.lcd_clear()


#---DHT22 (sonde temperature et humidité)
dht22=os.popen("/home/pi/thermo3/DHTXXD/DHTXXD -g17").read()

#print dht22
#pour extraire les données retourné par la sonde
explose_dht22=dht22.split(" ")
temperature = explose_dht22[1]
humidite = explose_dht22[2]
humidite = humidite[:-1]
#mylcd.lcd_display_string(temperature, 3, 11)
#mylcd.lcd_display_string(humidite,3, 16)
print temperature
print humidite

#---icone bus-----------------------------
fontdata1 = [[0b00011, 0b10111, 0b00110, 0b10111, 0b00111, 0b11111, 0b00101, 0b00010 ],[0b11111,0b11111, 0b10101, 0b11111, 0b11111, 0b11111, 0b00000, 0b00000 ], [0b11110, 0b11111, 0b01100, 0b11100, 0b11111, 0b11111, 0b10100, 0b01000] ]
mylcd.lcd_load_custom_chars(fontdata1)

#pour récupérer le météo sur internet (status, mini et maxi)
url = "http://www.meteo24.fr/meteo/hptool/index.php?cid=33X19027&cityName=Marly-le-Roi"
request = urllib2.Request(url)
handle = urllib2.urlopen(request)
content =handle.read()

splitted_page = content.split("",1)
splitted_page = splitted_page[1].split("", 1)
status = splitted_page [0]
status = status.replace('é','e')
status = status.replace ('è','e')

splitted_page = content.split("
max.
", 1) splitted_page = splitted_page[1].split("", 1) maxi = splitted_page [0] maxi = maxi.replace('°',chr(223)) splitted_page = content.split("min.
", 1) splitted_page = splitted_page[1].split("", 1) mini = splitted_page [0] mini = mini.replace('°',chr(223)) #----------------------BUS
#pour récupérer les informations des passages de bus
url2="http://wap.vtlesrabaux.mobi/horaireligne.php?ligne=268435463&arret=LES+LAMPES"
request2 = urllib2.Request(url2)
handle2 = urllib2.urlopen(request2)
content2 =handle2.read()

if content2.find("Ligne 10
vers MARLY LE ROI GARE") == -1 and content2.find("Ligne 10
vers MAIRIE DE MARLY LE ROI") == -1:
 print "aucun bus"
 bus = "aucun bus"
else:
 splitted_page2 =content2.split("MARLY LE ROI")
 splitted_page2 = splitted_page2[0]
 splitted_page2 = splitted_page2.split("Prochains passage")
 splitted_page2 = splitted_page2[1]
 print "_______________________"
 splitted_page2 = splitted_page2.split("mn")
 lastsplit=len(splitted_page2)
 lastsplit = (lastsplit -2)
 bus = splitted_page2[lastsplit]

 #----ok---
 bus = bus.split("'left'>")
 lastsplit = len(bus)
 bus = bus[lastsplit -1]
 
#pour afficher les informations (date, status, mini, maxi) 
mylcd.lcd_display_string("%s" %time.strftime("%d/%m/%y %H:%M"),1)
mylcd.lcd_display_string(status,2)
mylcd.lcd_display_string(maxi, 3, 5)
mylcd.lcd_display_string(mini, 3,)

#pour afficher un dessin de bus sympa sur 3 caractères
mylcd.lcd_write_char(0)
mylcd.lcd_write_char(1)
mylcd.lcd_write_char(2)

mylcd.lcd_display_string("             ", 4,3)
mylcd.lcd_display_string(bus, 4,3)
#pour afficher la temperature et le taux d'humidité de la sonde
mylcd.lcd_display_string(temperature, 3, 11)
mylcd.lcd_display_string(humidite,3, 16)

#afficher dans le programme (pour un fichier log) les informations
print status
print mini
print maxi
print bus

Pour le CRONTAB -e (et un fichier log)
#Bus
* * * * * /home/pi/ecran/bus.sh > /home/pi/ecran/logs/cronlog

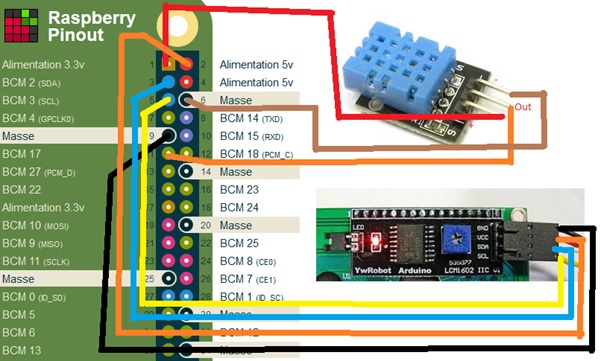
Rapide Schéma de rappel des branchement du raspberry, de l'écran LCD et du capture DHT

mercredi 25 janvier 2017

Raspberry épisode 19 : Electronique, l'écran LCD

Très proche de l'épisode précédant sur le capteur d'humidité et de température, cet article va expliquer comment brancher l'écran LCD 4x16. D'autant que l'objectif est d'afficher le résultat du capteur d'humidité sur l'écran LCD.

1°)Détail physique
A l'arrière de l'écran, on retrouve un ArduinoYwRobot, qui fera l'interface entre le Raspberry et l'écran.
-Sur la gauche, on peut trouver 2 PIN permettant le rétro-éclairage si un jumper y est installé.
-Au centre à droite, un régulateur bleu permet d'ajuster la puissance lumineuse de l'écran. (réglable avec un tournevis)
 -à droite 4 PIN pour relier le Raspberry Pi
    -GND : Masse
    -VCC : Alimentation électrique (3,3V est un peu faiblarde Broche1, préférez le 5,5V Broche 2)
    -SDA: Broche 3 du raspberry
    -SCL: Broche 5 du raspberry


1°) Connexion:
Pour connaître les PIN du port GPIO
http://fr.pinout.xyz/


2°) Activer l'interface IC2
http://www.raspberrypi-spy.co.uk/2014/11/enabling-the-i2c-interface-on-the-raspberry-pi/

En ligne de commande

sudo raspi-config
“Advanced Options”
Select “I2C”
    Select “Yes”
    Select “Ok”

    Select “Finish”

Redémarrer le raspberry
sudo su reboot


3°) Installer les outils IC2
http://www.circuitbasics.com/raspberry-pi-i2c-lcd-set-up-and-programming/

sudo apt-get install i2c-tools
sudo apt-get install -y python-smbus i2c-tools
reboot


test:
sudo i2cdetect -y 1
(une cellule doit ressortir des autres sinon vérifier vos branchements)
Relevez le numéro affiché !


4°)a°)Ecrire le driver I2C_LCD_driver.py.py (copier/coller)
en nano par exemple:

au début du fichier: changez les valeurs suivantes:
# i2c bus (0 -- original Pi, 1 -- Rev 2 Pi)
I2CBUS = 2
Si vous avez un Raspberry Pi1 choisissez 0, si vous avez un Pi0, Pi0W, un Pi2 ou 3 choisissez 1

# LCD Address
ADDRESS = 0x27
où 0x27 correspond au résultat du test fait au point 3. 
# -*- coding: utf-8 -*-
# Original code found at:
# https://gist.github.com/DenisFromHR/cc863375a6e19dce359d

"""
Compiled, mashed and generally mutilated 2014-2015 by Denis Pleic
Made available under GNU GENERAL PUBLIC LICENSE

# Modified Python I2C library for Raspberry Pi
# as found on http://www.recantha.co.uk/blog/?p=4849
# Joined existing 'i2c_lib.py' and 'lcddriver.py' into a single library
# added bits and pieces from various sources
# By DenisFromHR (Denis Pleic)
# 2015-02-10, ver 0.1

"""

# i2c bus (0 -- original Pi, 1 -- Rev 2 Pi)
I2CBUS = 0

# LCD Address
ADDRESS = 0x27

import smbus
from time import sleep

class i2c_device:
   def __init__(self, addr, port=I2CBUS):
      self.addr = addr
      self.bus = smbus.SMBus(port)

# Write a single command
   def write_cmd(self, cmd):
      self.bus.write_byte(self.addr, cmd)
      sleep(0.0001)

# Write a command and argument
   def write_cmd_arg(self, cmd, data):
      self.bus.write_byte_data(self.addr, cmd, data)
      sleep(0.0001)

# Write a block of data
   def write_block_data(self, cmd, data):
      self.bus.write_block_data(self.addr, cmd, data)
      sleep(0.0001)

# Read a single byte
   def read(self):
      return self.bus.read_byte(self.addr)

# Read
   def read_data(self, cmd):
      return self.bus.read_byte_data(self.addr, cmd)

# Read a block of data
   def read_block_data(self, cmd):
      return self.bus.read_block_data(self.addr, cmd)


# commands
LCD_CLEARDISPLAY = 0x01
LCD_RETURNHOME = 0x02
LCD_ENTRYMODESET = 0x04
LCD_DISPLAYCONTROL = 0x08
LCD_CURSORSHIFT = 0x10
LCD_FUNCTIONSET = 0x20
LCD_SETCGRAMADDR = 0x40
LCD_SETDDRAMADDR = 0x80

# flags for display entry mode
LCD_ENTRYRIGHT = 0x00
LCD_ENTRYLEFT = 0x02
LCD_ENTRYSHIFTINCREMENT = 0x01
LCD_ENTRYSHIFTDECREMENT = 0x00

# flags for display on/off control
LCD_DISPLAYON = 0x04
LCD_DISPLAYOFF = 0x00
LCD_CURSORON = 0x02
LCD_CURSOROFF = 0x00
LCD_BLINKON = 0x01
LCD_BLINKOFF = 0x00

# flags for display/cursor shift
LCD_DISPLAYMOVE = 0x08
LCD_CURSORMOVE = 0x00
LCD_MOVERIGHT = 0x04
LCD_MOVELEFT = 0x00

# flags for function set
LCD_8BITMODE = 0x10
LCD_4BITMODE = 0x00
LCD_2LINE = 0x08
LCD_1LINE = 0x00
LCD_5x10DOTS = 0x04
LCD_5x8DOTS = 0x00

# flags for backlight control
LCD_BACKLIGHT = 0x08
LCD_NOBACKLIGHT = 0x00

En = 0b00000100 # Enable bit
Rw = 0b00000010 # Read/Write bit
Rs = 0b00000001 # Register select bit

class lcd:
   #initializes objects and lcd
   def __init__(self):
      self.lcd_device = i2c_device(ADDRESS)

      self.lcd_write(0x03)
      self.lcd_write(0x03)
      self.lcd_write(0x03)
      self.lcd_write(0x02)

      self.lcd_write(LCD_FUNCTIONSET | LCD_2LINE | LCD_5x8DOTS | LCD_4BITMODE)
      self.lcd_write(LCD_DISPLAYCONTROL | LCD_DISPLAYON)
      self.lcd_write(LCD_CLEARDISPLAY)
      self.lcd_write(LCD_ENTRYMODESET | LCD_ENTRYLEFT)
      sleep(0.2)


   # clocks EN to latch command
   def lcd_strobe(self, data):
      self.lcd_device.write_cmd(data | En | LCD_BACKLIGHT)
      sleep(.0005)
      self.lcd_device.write_cmd(((data & ~En) | LCD_BACKLIGHT))
      sleep(.0001)

   def lcd_write_four_bits(self, data):
      self.lcd_device.write_cmd(data | LCD_BACKLIGHT)
      self.lcd_strobe(data)

   # write a command to lcd
   def lcd_write(self, cmd, mode=0):
      self.lcd_write_four_bits(mode | (cmd & 0xF0))
      self.lcd_write_four_bits(mode | ((cmd << 4) & 0xF0))

   # write a character to lcd (or character rom) 0x09: backlight | RS=DR<
   # works!
   def lcd_write_char(self, charvalue, mode=1):
      self.lcd_write_four_bits(mode | (charvalue & 0xF0))
      self.lcd_write_four_bits(mode | ((charvalue << 4) & 0xF0))
 
   # put string function with optional char positioning
   def lcd_display_string(self, string, line=1, pos=0):
    if line == 1:
      pos_new = pos
    elif line == 2:
      pos_new = 0x40 + pos
    elif line == 3:
      pos_new = 0x14 + pos
    elif line == 4:
      pos_new = 0x54 + pos

    self.lcd_write(0x80 + pos_new)

    for char in string:
      self.lcd_write(ord(char), Rs)

   # clear lcd and set to home
   def lcd_clear(self):
      self.lcd_write(LCD_CLEARDISPLAY)
      self.lcd_write(LCD_RETURNHOME)

   # define backlight on/off (lcd.backlight(1); off= lcd.backlight(0)
   def backlight(self, state): # for state, 1 = on, 0 = off
      if state == 1:
         self.lcd_device.write_cmd(LCD_BACKLIGHT)
      elif state == 0:
         self.lcd_device.write_cmd(LCD_NOBACKLIGHT)

   # add custom characters (0 - 7)
   def lcd_load_custom_chars(self, fontdata):
      self.lcd_write(0x40);
      for char in fontdata:
         for line in char:
            self.lcd_write_char(line)        
   Enregistrez le dans votre répertoire de travail


4°)b°)Ecrire le script test.py (copier/coller)
import I2C_LCD_driver
from time import *

mylcd = I2C_LCD_driver.lcd()

mylcd.lcd_display_string("Hello World!", 1)

   Enregistrez le dans votre répertoire de travail


5°)Rendre executable le script:
sudo chmod +x /home/pi/scriptaexecuter.py

test:
sudo python /home/pi/test.py
C'est à ce moment qu'il faut régler le contraste.

Pour les détails d'affichage, défilement, clignotement, effaçage d'écran, caractères particuliers:
http://www.circuitbasics.com/raspberry-pi-i2c-lcd-set-up-and-programming/

6°) CRON (pour lancer le script au démarrage du PI)http://www.instructables.com/id/Raspberry-Pi-Launch-Python-script-on-startup/?ALLSTEPS


7°) Caractères particulier-ou petits dessins rigolos-

Voici un script python qui affichera une jolie goutte d'eau (parfait pour représenter l'humidité)


import I2C_LCD_driver
from time import *
mylcd = I2C_LCD_driver.lcd()
fontdata1 = [
        [ 0b00100,
          0b01010,
          0b01010,
          0b01010,
          0b10001,
          0b10001,
          0b10001,
          0b01110 ],
]
mylcd.lcd_load_custom_chars(fontdata1)
mylcd.lcd_write(0x80)
mylcd.lcd_write_char(0)


Pour afficher le caractère sur la 1ere ligne utilisez 0x80
Pour afficher le caractère sur la 2eme ligne utilisez  0xC0
Pour afficher le caractère sur la 3eme ligne utilisez  0x94
Pour afficher le caractère sur la 4eme ligne utilisez  0xD4

Quelques exemples :


Droplet :

{
    B00100,
    B00100,
    B01010,
    B01010,
    B10001,
    B10001,
    B10001,
    B01110,
};

Thermometre :

{
    B00100,
    B01010,
    B01010,
    B01110,
    B01110,
    B11111,
    B11111,
    B01110
};


Soleil :

fontdata1 = [

        [ 0b00100,

          0b10101,

          0b01110,

          0b11011,

          0b01110,

          0b10101,

          0b00100,

          0b00000 ],

]
 Mais rien de mieux que de créer soit même ses caractères

Le site suivant va grandement vous aider et vous faire gagner du temps
https://omerk.github.io/lcdchargen/
sinon vous avez ce logiciel:
http://www.instructables.com/id/Controlling-a-character-LCD-with-an-Arduino/step6/Test-Code-3-Custom-Characters/

Voilà j'espère que vous aurez pu apprendre quelques chose et que vous aurez pu être un peu aidé.
Nous verrons dans un prochain article comment ajouter des informations provenant d'internet, de notre capteur DHT avec de jolie logo.
Ci-joint l'ensemble des sites qui m'ont été utile dans ma démarche.


http://forum.raspfr.org/viewtopic.php?id=1591
http://hardware-libre.fr/2014/03/raspberry-pi-utiliser-un-lcd-4x20/
http://innovelectronique.fr/2013/03/02/utilisation-du-bus-i2c-sur-raspberrypi/
http://www.circuitbasics.com/raspberry-pi-i2c-lcd-set-up-and-programming/
https://www.raspberrypi.org/forums/viewtopic.php?t=64468&p=477419
http://www.raspberrypi-spy.co.uk/2015/05/using-an-i2c-enabled-lcd-screen-with-the-raspberry-pi/
http://www.raspberrypi-spy.co.uk/2014/11/enabling-the-i2c-interface-on-the-raspberry-pi/
http://raspberrypituts.com/simple-raspberry-pi-lcd-setup/
http://sarahwithee.com/wp-content/uploads/lcd_example.txt
http://www.ytuongnhanh.vn/chi-tiet/custom-lcd-characters-160.html
http://www.instructables.com/id/Clock-with-termometer-using-Arduino-i2c-16x2-lcd-D/
http://www.quinapalus.com/hd44780udg.html
http://www.raviyp.com/embedded/142-16x4-lcd-line-addresses
https://www.youtube.com/watch?v=fR5XhHYzUK0
https://www.youtube.com/watch?v=M_4UIPLaIII